
Tabernanthe iboga (family Apocynaceae) is native to Western Africa; Angola, Cabinda, Cameroon, Central African Republic,…

Making Home Biochar
What a destructive and terrible summer of bushfires in Australia, to say the least. Over 11 million Hectares (yes, thats a shitload) completely burnt (not just a low intensity fire, these are high intensity fires damaging entire ecosystems) and an estimated loss of 1 billion animals and countless plants and invertebrates. Its hard to get your head around the destruction, largely due to an extended drought over those regions, coupled with record heat and climatic conditions fuelling wild fires (negative SAM, positive IOD, etc). There’s plenty you’ve read about these fires that I don’t need to go into it.
What I want to go into here is a technique for making your own biochar at home, with the materials sourced from your garden, scavenged items and other biomass; products that when burnt will give you heat ,an awesomely entertaining and contained fire to enjoy in wintertime, which when quenched, will give you beautiful black gold carbon (charcoal/biochar). This converts wood and combustable materials from your own backyard/property into a stable form of carbon that can be used within your garden to increase fertility and store carbon that would have slowly been released to the atmosphere when composted, or quickly, if it is burnt in a traditional way (burnt to ash).
Biochar is a fancy word for charcoal that is enriched with compost/fertiliser to create a soil amendment. Think of it as biologically-enhanced-charcoal. When you have a regular fire, the wood will gasify (called syngas) and this feeds the fire, leaving charcoal behind. As the fire continues to burn past the charcoal stage, the carbon becomes carbon dioxide and is released to the atmosphere, leaving behind ash, which is all the minerals and other elements left behind. What you want to do when making biochar, is to stop the fire once the majority of the materials have been turned into charcoal, but before they continue to burn and end up as ash. So you must quench the fire either with water (easiest way) or by removing the oxygen to smother the flames and arrest the burn (what they do commercially).
The first step is to get yourself a good intact 200L steel drum, like the ones that are used for oil, methylated spirits, etc; you can buy them from recycled building material centres. Make sure its empty and take precautions if its had flammable liquid in it, before you cut it. Grab an angle grinder. I cut mine at the 3/4 high mark, saving the lid for later (this keeps the drum dry when not in use and you can stack it full over of dry and semi dry stuff over weeks and it drys out until you are ready to fire it up). Then you want to turn it into a rocket stove; this basically means you need to cut some slits in both the base and around the drum. This keeps the fire going like crazy as it has access to oxygen at all times through these slits. I put four evenly spaced 200mm slits about 5mm wide in the base (like an X but not connected in the centre). You can just use a grinding wheel on the angle grinder as this is just the right width. Then I cut a further four horizontal 1-2cm cm windows around the outside (see pictures) in the bottom quarter of the drum (make them about 150mm up from base, otherwise charcoal can fall out too easy). Then higher up cut four evenly spaced vertical windows 1cm wide. The drum is now done and can be fired up for the first time. The paint on the outside will burn off and is unavoidable; I can’t even think of a safe way to remove it, if you use a paint remover then you have a toxic liquid waste product). Make sure you get it cranking and stand back.
Edit; I’ve added pictures of my new char stove (CharStar V3 🙂 as this is my 3rd version and a marked improvement over the first one!). I bought a mig welder and wanted to try a new version with added legs welded onto the outside, as well as adjusting the placement of the air intake slits. You will find that with regular use you will get about a year out of your char stove. Quenching the fire with water and the constant heating and rapid cooling with age the drum. So use this as an opportunity to redesign it each season if necessary. I used star pickets, cut 400mm long and welded so they are 300mm off the ground. I also made the drum a little higher, 700mm tall and 1m tall with legs.


For your first biochar attempt, stack up the stove loosely with stuff of around the same thickness so that it will all convert into charcoal within a relatively similar timeframe. I’ve used all types of material, leaves, sticks, left over material from seed harvests like Anadenanthera pods, etc). You can add bigger logs but they may need several burns to fully convert to charcoal. Split logs so they catch fire quicker.
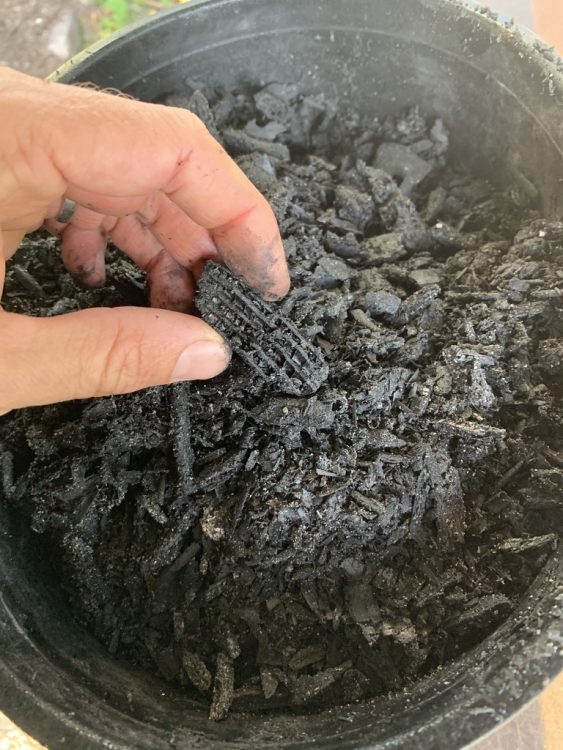
Once you’ve enjoyed that fire and you have stirred the fire a bit and can see its at that charcoal stage, you want to cut the oxygen. If you’ve got non-potable water like dam water, use that. Spray it deeply and turn it over with a hoe, etc to make sure that you can’t see any coals glowing. There’ll be heaps of steam coming off it and it feels bad to put a raging fire out 🙂 but its all ok once you see you have saved a few KG of charcoal from turning into ash, with which to make biochar.


So once that charcoal has cooled down, best to leave it until morning, you can collect it up in a wheelbarrow and I like to smash it into fine particles by using a wooden mallet. Then I mix that with an appropriate amount (around 1:1 or 1:0.75 of char:manure) of a high Nitrogen fertiliser; there’s a cheap poultry manure you can get in Bunnings, its about $3 a bag and this works really well. Use what ever you want though, a good sheep/poultry based manure would be good, just make sure it’s not pelletised, you want a fine material. The idea with the fertiliser is to activate the charcoal so that bacteria can colonise the micro structure of the carbon and this acts as a repository of nutrition and biology for the soil you add it to. After all, soil is only as good as the ecology it harbours.
So there you have it. An easy and enjoyable way to make biochar at home, using the resources you have available. You’re helping to store carbon within your own soil for a very long time, increasing the fertility of your soils, as well as potentially reducing ‘fuel loads’ (I hate this term but we all know what it means).
Related Posts


Comments (1)
Leave a Reply
You must be logged in to post a comment.
Wow that is incredibly useful information. Now all I need is a collaborative handyman to help with all my growing list of yard projects.